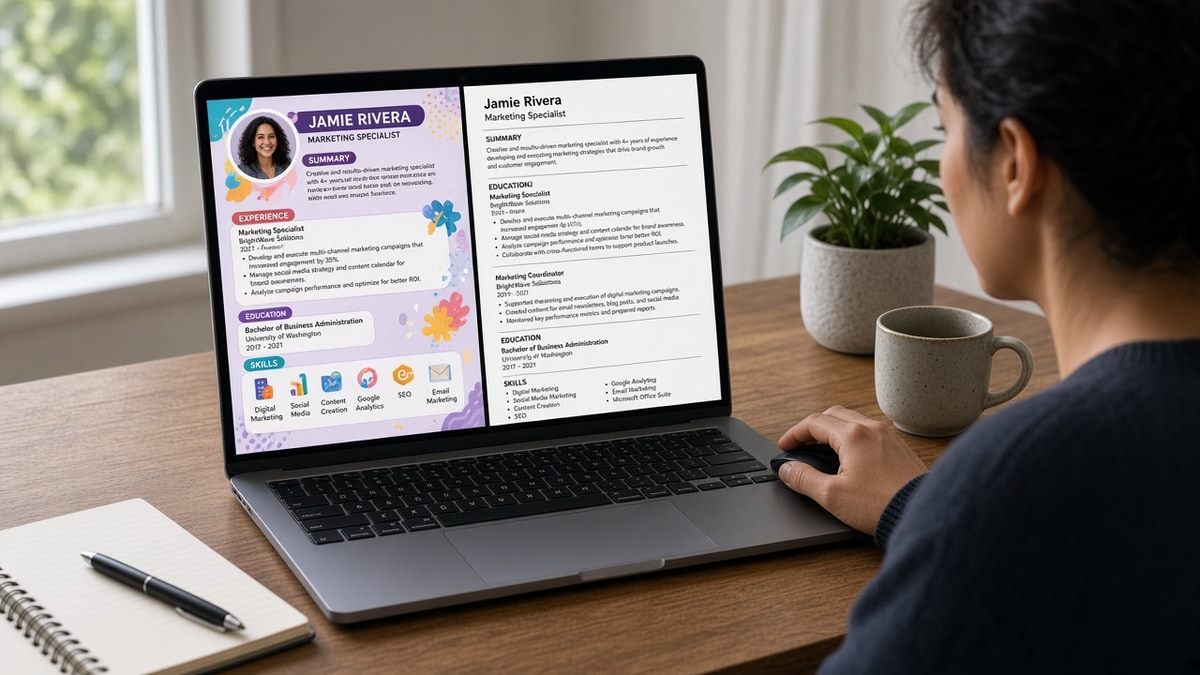
8 min read
Your old resume still looks sharp on screen. It's got color blocks, a skills sidebar, maybe a logo from a template you loved in 2019. None of that survives a Workday upload the way you'd expect.
You don't need a new career story tonight. You need the same bullets in a file parsers can read without fighting columns, icons, or mystery section names. If you've been copy-pasting the same attachment for years, you're not lazy. You're using a container the system can't translate.
Check your resume for free on whatever version you're about to rebuild. If the checker already flags scrambled Experience, fix structure before you chase posting keywords. Don't spend an hour on summary prose until the parser can find your last title.
Below: five steps to convert an old Word or design export into a parser-clean file, two edge cases, and what automatic really means when there's no one-click fix.
Quick Wins
- Paste Special as unformatted text so old fonts and boxes do not copy over.
- One column only: contact, Summary, Experience, Education, Skills.
- Save master as DOCX. Export PDF from that file, not from design software.
- Run checker feedback before every batch of applications.
What automatic conversion actually does
Search results promise one-click ATS conversion. In practice, the fast path is mechanical: your word processor strips formatting when you paste as plain text, and you re-stack sections in an order parsers recognize.
Automatic does not mean hands-off. It means the software removes bold colors and table grids for you. You still confirm employer names, Month Year dates, and which block is Experience.
Checker feedback is the second half. Upload the rebuilt DOCX and read what the parser extracted. Missing job titles mean your layout still hides work history. Scrambled dates mean a sidebar or table is still in the file.
Job searching is exhausting enough without chasing a fantasy button. The workable version of how to turn an old resume into an ATS resume automatically is paste, flatten, test, export.
Word and Google Docs give you the closest thing to automation: Paste Special strips most design chrome in one action. What they cannot do is guess which sidebar line belongs to which employer. You still assign every date and title to the right job after the paste lands.
HireFlow's checker adds the feedback loop design tools skip. It shows parsed field order the way Workday or Greenhouse might store it. That preview is worth more than any template marketplace badge promising ATS ready without reading your file.
For file-type tradeoffs after rebuild, see PDF vs Word resume for ATS .
How to turn an old resume into an ATS resume automatically: five steps
Work in order. Each step ends with a quick pass or fail so you know whether to continue or stop and fix the source file.
Step 1: Open the old file and paste as unformatted text
Open your legacy DOCX or PDF. Select all. In a blank Word or Google Docs file, use Paste Special and choose unformatted text.
Before: Paste brings colored tables, text boxes, and icon bullets.
After: Paste is plain black text with line breaks you can edit.
If paste from PDF is empty, treat the file as image-based. Use built-in OCR or retype into the blank doc. Do not keep uploading the same scanned export.
Step 2: Strip design elements and odd sections
Delete logos, photos, skill star charts, Hobbies blocks, and page headers or footers. Remove hidden tables used only for alignment.
Rename creative headers to Experience, Education, and Skills. Move volunteer or freelance proof under Experience with real dates instead of a Passion Projects label.
Edge case: old resume built in a design tool you no longer edit. Export PDF, paste text out, and rebuild only in a word processor. Re-exporting the same template changes colors, not parser behavior.
Edge case: multiple short contract roles on one page with shared bullets. Give each contract its own title line and date range. Parsers attach bullets to the nearest employer name above them. Shared bullet pools create duplicate or orphan entries in recruiter search.
Step 3: Rebuild as a single-column layout
Before: Skills sit in a left sidebar. Dates float in a right column. Experience starts on page two.
After: One vertical stack: name and contact, three-line Summary, Experience with current role first, Education, Skills as comma-separated text.
Use 11-point Calibri or Arial. Standard round bullets from the word processor. Margins near one inch. Black text on white. Boring parses.
Each role block: Job Title, Employer, City or Remote, Month Year to Present or Month Year. Then bullets. No subheaders inside the role.
Summary belongs above Experience and stays short. Two or three lines naming your level, domain, and one proof point from the last three years. Long objective paragraphs from older templates waste space parsers do not weight heavily anyway.
Skills at the bottom as plain text works for most corporate roles. If the posting lists required tools, mirror three of them in bullet one under your current job so the skill is tied to paid work, not a floating list.
Step 4: Run checker feedback on the DOCX
Save as Firstname-Lastname-Resume.docx. Upload to an ATS checker before you touch posting keywords.
I've watched uploads in Greenhouse where the PDF thumbnail looked perfect and the parsed profile showed a graphic skills bar where Experience should have started.
Fix heading order and date lines until the preview lists your current title first. Then mirror one required skill from the posting in bullet one under that role.
Run the checker twice if you export PDF: once on DOCX, once on the PDF export. Some portals parse PDF differently than Word. A pass on DOCX plus a fail on PDF means your export settings still embed layout artifacts.
Copy-paste skeleton once layout is flat:
Copy-paste block
[Job Title] | [Employer] | [City, ST or Remote] | [Month Year] to Present
• [Outcome with scope tied to this employer].
• [Tool or method from this role].
• [Result line with a number from this job only].

[Prior Job Title] | [Employer] | [Location] | [Month Year] to [Month Year]
• [Same bullet pattern].

SKILLS
[Comma-separated tools and methods, no star ratings]
Step 5: Save master DOCX and export PDF only if required
Keep the DOCX as your master apply file. Export PDF from Word or Google Docs only when the posting demands it.
Re-run select-all paste on the new PDF. If Experience order scrambles, submit DOCX when the portal allows it.
Name files predictably: Firstname-Lastname-Resume.docx and the same stem for PDF. Recruiters download dozens of Resume.pdf files per req. A clear filename is a small clarity win humans notice even when parsers do not care.
Edge case: academic CV with long publication lists. Keep the main file to Experience and Education an ATS can sort by date. Attach publications separately only if the posting allows a second file.
Edge case: career break between roles. Add one honest line in the timeline, Career Break, Caregiving, March 2023 to August 2024, instead of hiding the gap with a decorative gap-year section header parsers will not map.
For deeper PDF rebuilds, read how to make your resume ATS compliant from an old PDF .
Conversion traps that survive paste
Using an online compressor that rasterizes text. Some tools turn your DOCX back into images. Export uncompressed from the word processor.
Keeping invisible tables for spacing. Grid lines you cannot see still scramble import order. Use line breaks and tabs instead.
Before: Skills section is a five-star chart pasted from the old file.
After: Skills spelled out in plain text or woven into bullets under the job where you used them.
Keyword stuffing after conversion. A giant Skills block without job proof does not fix a parser error. Structure first, then tune bullet one per posting.
Uploading track-changes versions. Redlines export as messy strings. Accept all edits before save.
Before: Footer on every page repeats your name and splits Experience lines.
After: Header and footer removed. Contact block on page one only.
This will not fix applying to roles where you lack core requirements. It stops a qualified file from dying because the parser never read your last five years of work.
For why some files never reach a human, see why your resume never reaches a human .
Use checker feedback before upload
When you only have one evening, spend it on upload readiness, not optional cover letter prose.
Run the free ATS checker on the DOCX you rebuilt tonight. Fix heading order and date lines before you chase posting keywords. A fast apply that parses wrong is still a slow reject.
Need a clean single-column base? Build your resume and download DOCX before you paste old content in. Same structure, fewer layout surprises when you run the text-select test again.
Do this now: Paste your old file as unformatted text, save a DOCX master, and run one checker pass before you close the laptop. Log the filename so you know what you upload tomorrow.
Your export checklist
Learning how to turn an old resume into an ATS resume automatically is mostly accepting that paste-and-rebuild beats any magic template swap. Your story stays the same. The container changes.
- Paste old content as unformatted text into Word or Google Docs.
- Delete tables, sidebars, and non-standard section headers.
- Rebuild one column with Month Year dates and current role first.
- Run checker feedback on DOCX before export.
- Save PDF only when the posting requires it.
Keep the working DOCX as your master apply file. Tailor bullet one per posting, not the whole design. Parsing fixes are one-time work. Keyword tweaks are per req.
You do not need a prettier file. You need a readable one. Once the parser sees your Experience in order, you are back in the same pool as everyone else who applied with a boring, specific document.
When a posting marks cover letter as required, generate a cover letter that names your current title once. The letter and rebuilt resume should agree on scope so a recruiter does not see two different seniority levels across attachments.
Read more
Frequently asked questions
No single button fixes layout. Automatic conversion in practice means paste your old file as unformatted text into Word or Google Docs, let the word processor strip design chrome, then rebuild as one column with standard headers. A checker shows whether titles and dates imported correctly before you upload to Workday or Greenhouse.
Start from the editable source if you still have it. Old DOCX files paste cleaner than PDF exports from design tools. If you only have a PDF, run select-all and paste into Notepad first. Empty paste means the file is image-based and you need OCR or a retype, not another export.
A straightforward Word file with two columns usually takes thirty to forty-five minutes to flatten and checker-test. A scanned print or heavy design export can take longer because you are retyping dates and employer names. Budget one evening for structure, then tailor bullets per posting later.
Build and save master files as DOCX. Export PDF only after the DOCX passes a paste test and parser preview. If the posting specifies PDF, export from Word or Google Docs, not from a design template. When the portal allows either format and PDF scrambles Experience order, submit DOCX.