12 min read · Six upload fixes
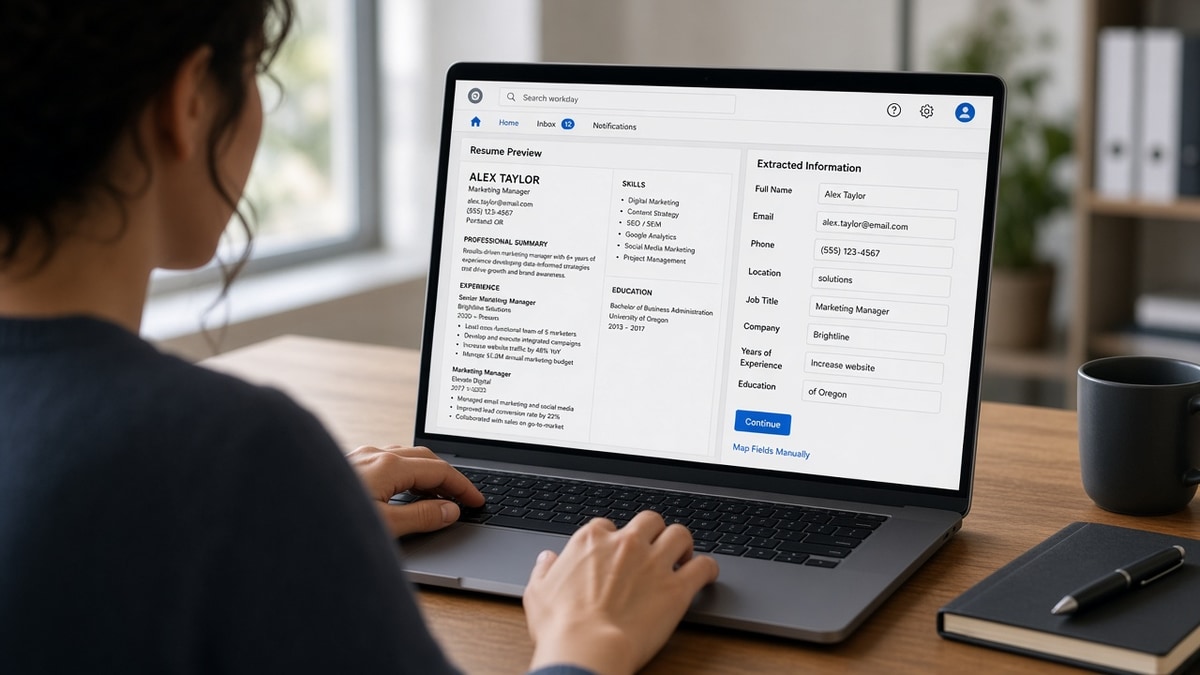
You upload a clean PDF. Workday's preview shows your summary under Skills, your current title attached to a job from 2019, and a blank end date on the role you still hold. You're not crazy. The file looked fine on your screen. The parser read a hidden column or a table cell out of order, and you won't catch it until you read the preview pane.
Before you rebuild anything, check your resume for free against the posting you are targeting. When bullets and dates already sit in plain Experience rows, the steps below focus on upload layout, not keyword stuffing.
Job searching through Workday portals is slow enough without fighting a template you bought five years ago. Below you'll walk through six fixes in order, edge cases when the preview looks almost right, and what to verify before Submit.
Quick Wins
- Read the Workday preview pane before you touch autofill or click Next.
- Toggle gridlines in Word and delete any table around dates or skills.
- Paste all PDF text into Notepad. If order breaks, switch to DOCX or rebuild.
- Put phone and email on line one of the body, not in a header graphic.
What the Workday upload preview is actually showing you
Workday does not render your resume like a recruiter opening an attachment in email. It maps text into profile fields using reading order. Sidebars read before main content. Table cells read left to right even when your eye reads down a column.
The preview is the file the system will search and screen. If bullet three from your current role lands under an old internship, keyword matches attach to the wrong employer. If dates are blank, tenure filters drop you even when the PDF looks perfect.
Common symptoms map to layout objects, not bad luck. Skills parked in a right column import before Experience. Contact info trapped in a header may never reach phone or email fields. Icons and skill bars are images, so the text beside them can orphan.
Bullets inside table cells are another repeat offender. The parser reads across the row, so metric lines from three roles can merge into one block with no employer labels. Plain stacked bullets under each title fix that in one rebuild pass.
And if you already applied once, do not assume the stored file fixed itself. Many portals let you replace the attachment. Upload a rebuilt file, confirm the preview, then save the profile. Recruiters often open the parsed view first, not the designed PDF you attached.
For bullet wording once layout is clean, see how to write a resume summary that passes ATS and sounds human . Layout gets you into the right fields. Bullets still carry the screen.
Workday resume upload formatting issues: fix them in this order
Don't randomize fixes. Strip layout traps first, then pick a file type, then verify dates and contact lines. Six steps. Same sequence every time you hit a new Workday link.
Before: Two-column template with dates in a right-aligned table cell. Preview shows current title under Education and blank end dates on open roles.
After: Single-column DOCX with Senior Analyst, Northwind Health · March 2021 to Present on one line, bullets stacked directly underneath in plain list style.
Before: Contact info trapped in a header graphic. Phone digits don't appear anywhere in preview search.
After: Name, city, phone, and email on line one of the body. Ctrl+F finds phone digits inside the exported PDF before re-upload.
Step 1: Stop at the preview pane before autofill
Upload the file and pause. Scroll the preview text. Mark what's wrong: missing dates, duplicated employers, summary text under Skills, phone digits absent. Screenshot the preview if you'll rebuild offline.
Do not click Next hoping autofill will sort it. Autofill copies the same scrambled parse into profile fields. You'd be correcting garbage twice.
Step 2: Rebuild as single-column with no tables or text boxes
Open the source in Word or Google Docs. Turn on formatting marks or gridlines. Delete sidebars, text boxes, and invisible tables. Stack sections vertically: contact block, summary, Experience, Education, Skills.
Use standard headings recruiters expect: Experience, Education, Skills. Fancy labels like Career Highlights sometimes map to nothing. One column. One reading path. No nested columns inside Experience.
If you see a grid around dates, rebuild that block as plain lines. Month Year to Month Year on the same line as employer and title. Not in a right cell.
Step 3: Export DOCX or PDF using the paste test
When the posting accepts both, export each. Select all text from the PDF and paste into Notepad. Repeat with DOCX. Whichever keeps section order wins.
PDFs from Word or Google Docs usually work when text is selectable. Scanned PDFs fail every time. DOCX from old templates sometimes carries hidden XML junk that adds blank rows in preview. Plain export beats pretty export every time you are unsure.
Font choice matters less than layout, but stick to Calibri, Arial, or Times New Roman at 10.5 to 12 point. Decorative script fonts sometimes export as empty boxes in the preview pane.
If only PDF is allowed and paste order breaks, rebuild in Word, save DOCX for editing, then export a fresh text-based PDF. Re-run the paste test before you return to Workday.
Step 4: Put each job title and date range on one line
Write: Senior Analyst, Northwind Health · March 2021 to Present. Same line or wrapped paragraph directly under it for bullets. Never float dates in a margin column.
Use Month Year consistently. March 2021 to August 2024 beats 03/21 or 2021 only. Present or Current for open roles. Match what's on your LinkedIn if recruiters will cross-check.
I've screened Workday batches where the preview showed clean bullets but autofill parked the job title under Education, and recruiters reject that file before bullet one gets read.
Step 5: Move contact details out of headers and footers
Line one of the body: Your Name · City, ST · phone · email · LinkedIn URL if you use one. Delete header graphics that repeat the same lines. Remove page footers with page numbers only if they push contact info off page one.
After export, Ctrl+F or Cmd+F your phone digits inside the PDF. If search finds nothing, Workday won't either.
Step 6: Re-upload and match every parsed field
Upload the rebuilt file. Read preview text again. Compare employer names, titles, and date ranges to your source. Fix remaining profile fields by hand only after the preview aligns.
Submit when titles sit under the right employers and open roles show Present. If one date still sticks to the wrong job, go back to Step 2. Typing over a bad parse without fixing the attachment leaves two versions of you in the system.
Copy-paste: single-column experience block
EXPERIENCE

Senior Operations Analyst, Northwind Health · March 2021 to Present
• Built weekly headcount dashboards in Workday reporting, cutting manager ad hoc requests
• Owned req-to-offer cycle metrics for 140 open roles across three business units

Operations Coordinator, Apex Logistics · June 2018 to February 2021
• Processed 40+ carrier invoices weekly with 98% on-time payment accuracy
When the preview looks almost right but autofill still breaks
Designed templates with icon rows. Skill icons look harmless. Parsers skip the glyph and grab neighboring text, which shuffles short skill tokens ahead of job titles. Replace icons with a comma list or plain bullets under Skills.
Multiple jobs at one employer. Stacking two titles under one company name without repeating the employer line sometimes merges roles. Repeat the employer line for each title if the preview collapses them.
Academic CV sections. Publications, grants, and committees belong on academic CVs. On corporate Workday flows they often map to random fields. Split a one-page resume file for corporate reqs and keep the long CV for portals that accept full uploads separately.
Password-protected or hybrid PDFs. Some exports embed fonts in ways that block select-all. If paste returns blank or partial text, re-export from Word with standard fonts: Calibri, Arial, or Times New Roman at 10.5 to 12 point.
Job searching is draining when silence feels personal. These fixes won't land you a role you're underqualified for. They stop a qualified file from dying because the upload preview scrambled your dates.
When silence continues after the file parses cleanly, read why your resume never reaches a human for filters beyond formatting.
Verify the file before you hit Submit
Manual checks catch layout.order. A checker catches missing posting language still sitting only in a sidebar you deleted. Run both after Step 6 looks good.
Paste the job description and your rebuilt file into HireFlow's ATS format check . Fix any experience-row gaps before you upload again. Keywords in Skills alone rarely survive Workday screens when bullets lack the same terms.
Need a clean starting layout? Build your resume as single-column output, then export DOCX, run the paste test, and return to the Workday preview.
When the portal also asks for a cover letter, generate a cover letter in plain text only after the resume preview matches your source file. Don't upload a designed letter while the resume still parses scrambled.
Do this now: Upload once, screenshot the bad preview, rebuild with gridlines on, re-upload, and compare line by line. Submit only when titles and dates match.
Submit only after the preview matches your file
Workday resume upload formatting issues trace back to reading order, not mystery algorithms. The preview tells you what imported. Strip tables and columns, pick the file type that passes the paste test, line up dates with titles, and re-upload until the text matches.
You can't control how fast a req moves. You can control whether recruiters see your current title on the right employer with dates attached. Fix the attachment first. Touch autofill second. Submit last.
This won't fix applying to senior roles with mid-level scope. It stops a strong candidate from getting filtered out because the upload preview hid tenured dates behind a template column.
Read more
Frequently asked questions
Workday reads your file top to bottom in one column. Sidebars, tables, text boxes, and header graphics often import out of reading order, so job titles land under Education or dates vanish. Rebuild as plain stacked text, re-upload, and compare the preview line by line before you click Next.
Run the paste test on both exports. Copy all text from each file into Notepad. Whichever keeps section order and searchable phone digits wins. If PDF text jumbles, upload DOCX saved from Word with standard headings. If DOCX adds mystery blank rows, try a text-based PDF from Word instead.
Yes, but fix the source file first. Typing over bad autofill without rebuilding leaves the stored attachment scrambled for the recruiter view. Upload a clean single-column file, confirm the preview, then edit any remaining profile fields by hand. Never submit while dates still show under the wrong employer.
They often do. Icons and progress bars are images or nested shapes parsers skip. Canva and similar design exports hide table grids that reorder bullets. Export plain Word or Google Docs, toggle gridlines on, delete any table around dates or skills, then export again before you re-upload.